GrovePi and Hologram Nova CLI Installation on Raspberry Pi Zero
Raspberry Pi Zero W (or Raspberry Pi zero WH ) is one of the smallest and ultra-low-cost computer available that has both Wi-Fi and Bluetooth available. Because of its potential, available software and community support, it can be used in a wide number of IoT and robotics projects.
The main difference between Raspberry Pi Zero W and WH is that Raspberry Pi Zero WH comes with pre soldered header. It is important to have the GPIO pins available with a Raspberry Pi Zero W(H), before integrating with Grovepi Zero kit. If one starts Raspberry Pi Zero W, instead of WH, solderless Raspberry Pi pin headers can used used to attach the pins as an alternative to soldering the pins.
GrovePi Zero from Dexter Industries is an add-an board for Raspberry Pi zero W that allows various Grove sensors directly to the board. There exists a number of Grove sensors such as temperature, humidity, air quality, etc that can be used for various IoT projects. GrovePi Zero board can be used to the Grove sensors using plug-n-play approach instead of soldering various sensors or using a number of wires connecting through a breadboard.


The main advantage in using GrovePi zero board is that it allows one to connect hundreds of different sensors and one can use an open source programming language such as Python to monitor, control and automate the devices.
It uses Arduino interface between Raspberry Pi Zero and Grove sensors the communication between Raspberry Pi and Grove Pi Zero board occurs over the i2C interface.
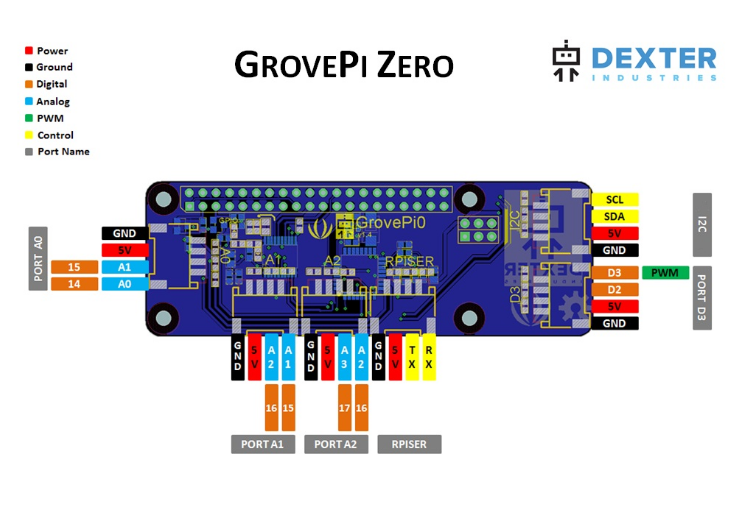
Following Pinout diagram shows the functions available on different ports and how they can be used while programming.
Raspberry Pi Zero W (or Raspberry Pi zero WH ) is one of the smallest and ultra-low-cost computer available that has both Wi-Fi and Bluetooth available. Because of its potential, available software and community support, it can be used in a wide number of IoT and robotics projects.
The main difference between Raspberry Pi Zero W and WH is that Raspberry Pi Zero WH comes with pre soldered header. It is important to have the GPIO pins available with a Raspberry Pi Zero W(H), before integrating with Grovepi Zero kit. If one starts Raspberry Pi Zero W, instead of WH, solderless Raspberry Pi pin headers can used used to attach the pins as an alternative to soldering the pins.
GrovePi Zero from Dexter Industries is an add-an board for Raspberry Pi zero W that allows various Grove sensors directly to the board. There exists a number of Grove sensors such as temperature, humidity, air quality, etc that can be used for various IoT projects. GrovePi Zero board can be used to the Grove sensors using plug-n-play approach instead of soldering various sensors or using a number of wires connecting through a breadboard.


The main advantage in using GrovePi zero board is that it allows one to connect hundreds of different sensors and one can use an open source programming language such as Python to monitor, control and automate the devices.
It uses Arduino interface between Raspberry Pi Zero and Grove sensors the communication between Raspberry Pi and Grove Pi Zero board occurs over the i2C interface.
Following Pinout diagram shows the functions available on different ports and how they can be used while programming.
1.) Download latest version of Raspibian from Raspberry pi download link. Install the Raspberry Pi image on a SD card using instructions provided in installation guide.
2, Install Grove Pi software and reboot using following commands:
sudo curl -kL dexterindustries.com/update_grovepi|bash
sudo reboot
Run the firmware update without any sensors or HDMI connected to the pi. Run the following commands to update the firmware:
cd /home/pi/Dexter/GrovePi/Firmware

sudo bash firmware_update.sh
Then next, let’s reinstall the GrovePi dependencies (there might be something that’s still not set up). After you update the firmware, you’ll reboot it. So, open a terminal and follow this commands:
cd /home/pi/Dexter/GrovePi/Script

sudo bash install.sh

sudo reboot
4.) Get a Hologram SIM and register it at Hologram portal.

5.) Follow the Hologram's documentation to install Hologram's Command Line Interface (CLI) and test the connectivity as shown in the documentation. Hologram CLI and Python SDK can be installed using a curl command as shown below :
 curl -L hologram.io/python-install | bash

 Update to a latest version:
   curl -L hologram.io/python-update | bash

 Check signal strength:
     sudo hologram modem signal

 Send a sample data message:
     sudo hologram send "Hello World"
ReplyDelete[p[